I've been busy with a new project!
I came across an industrial Singer 31-15 sewing machine for $100 and I went straight away to pick it up. I knew even before seeing it in person that the cords would need to be replaced on the motor. I was going to try and keep the original clutch motor because it's part of the machine (they've been together since 1947!) but after working with the machine for a few minutes at home I realized it wouldn't be worth dealing with the speed and noise.
In this post I will show you how I restored the table, what parts on the machine I replaced (and why), how I fixed the wires on the clutch motor (for someone else to use it) and how to set-up and install a servo motor under the table.
This project took me 10 days total. If I didn't have to wait for parts to arrive it would have taken half the time (waiting is SO hard for me)! At the end I'll break down how much I spent.
Below are several before and after pictures. I love seeing the difference - even I was surprised after comparing!
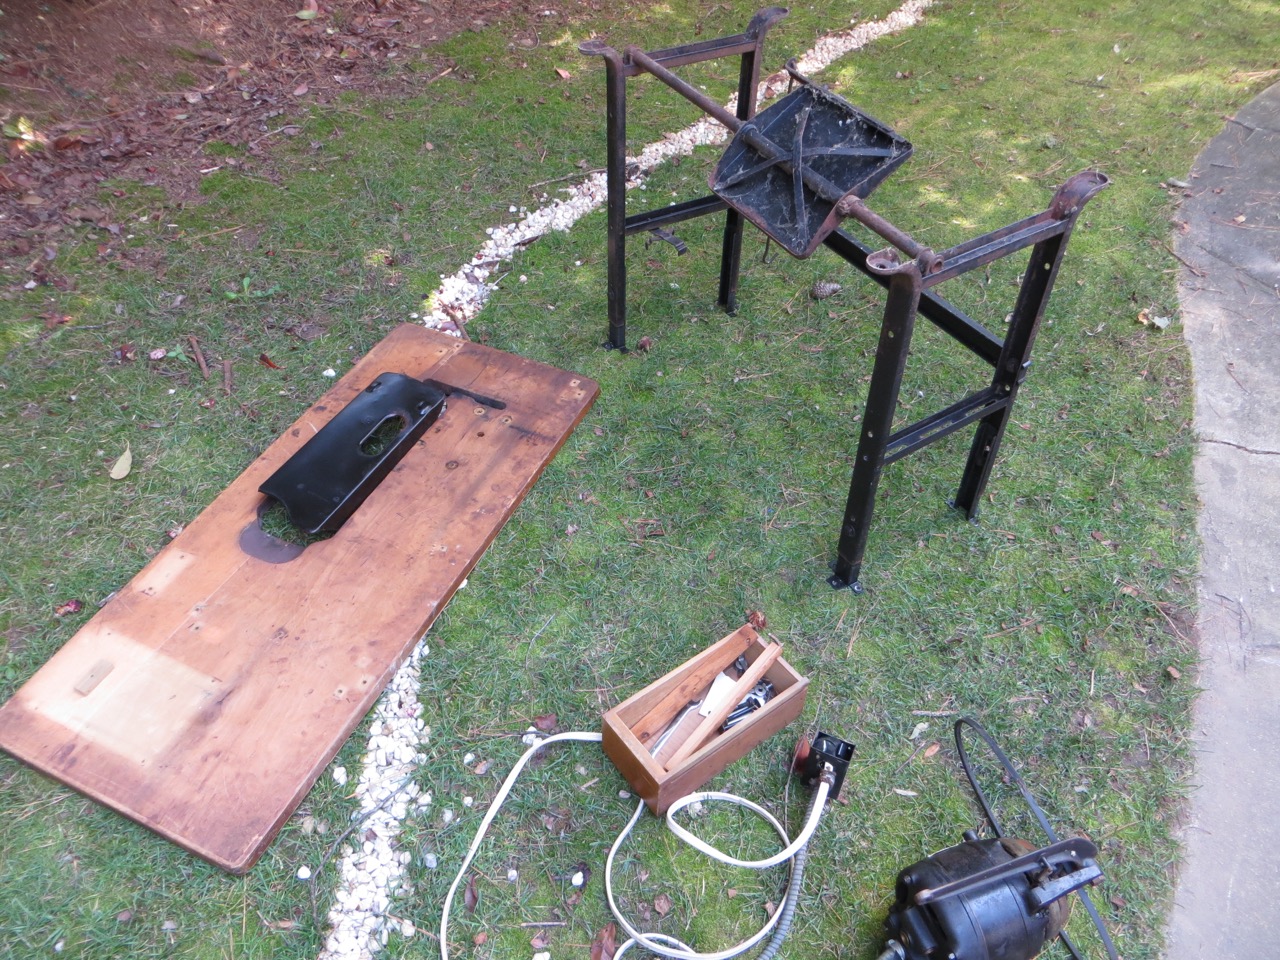
I first disassembled the table so while the finish was curing for a few days I could work on the machine.
TABLE DISSASEMBLY AND MAKEOVER
To fix the peeling veener on the table I blew wood glue down into the cracks with my air compressor.
Clamp for a few hours (wipe off excess glue while wet). Sand remaining-dried glue.
These are the supplies I used for filling gaps and preparing table for stain.
Mix wood filler and hardener. The amounts specified on the label aren't precise so I do about 12 parts putty to 1 part hardener.
You only have 5 minutes to work with the putty before it dries - use a putty knife to press into gaps.
While the filler was hardening I worked on the pan that sits below the machine. I wiped it down and sanded off rust/smoothed out the metal.
Sand table smooth. I filled the 3 large holes from the old motor knowing they wouldn't match up with the new servo motor. I also sanded the drawer and wood spindle for holding the machine up when tilted back.
I taped off the table so I could spray paint the pan on both sides.
I did a coat of primer and two coats of black hammered finish. I love the hammered finish because it hides imperfections really well and it has a nice look.
I used Thompson's WaterSeal stain in semi-transparent, maple brown color to coat all the wood surfaces. Even though this is outdoor stain I like to use what I have on hand :)
Once the table was dry I used a coat of paste wax on all the wood surfaces.
Buffed smooth with my buffer (so handy)! It made the finish silky smooth and beautiful!
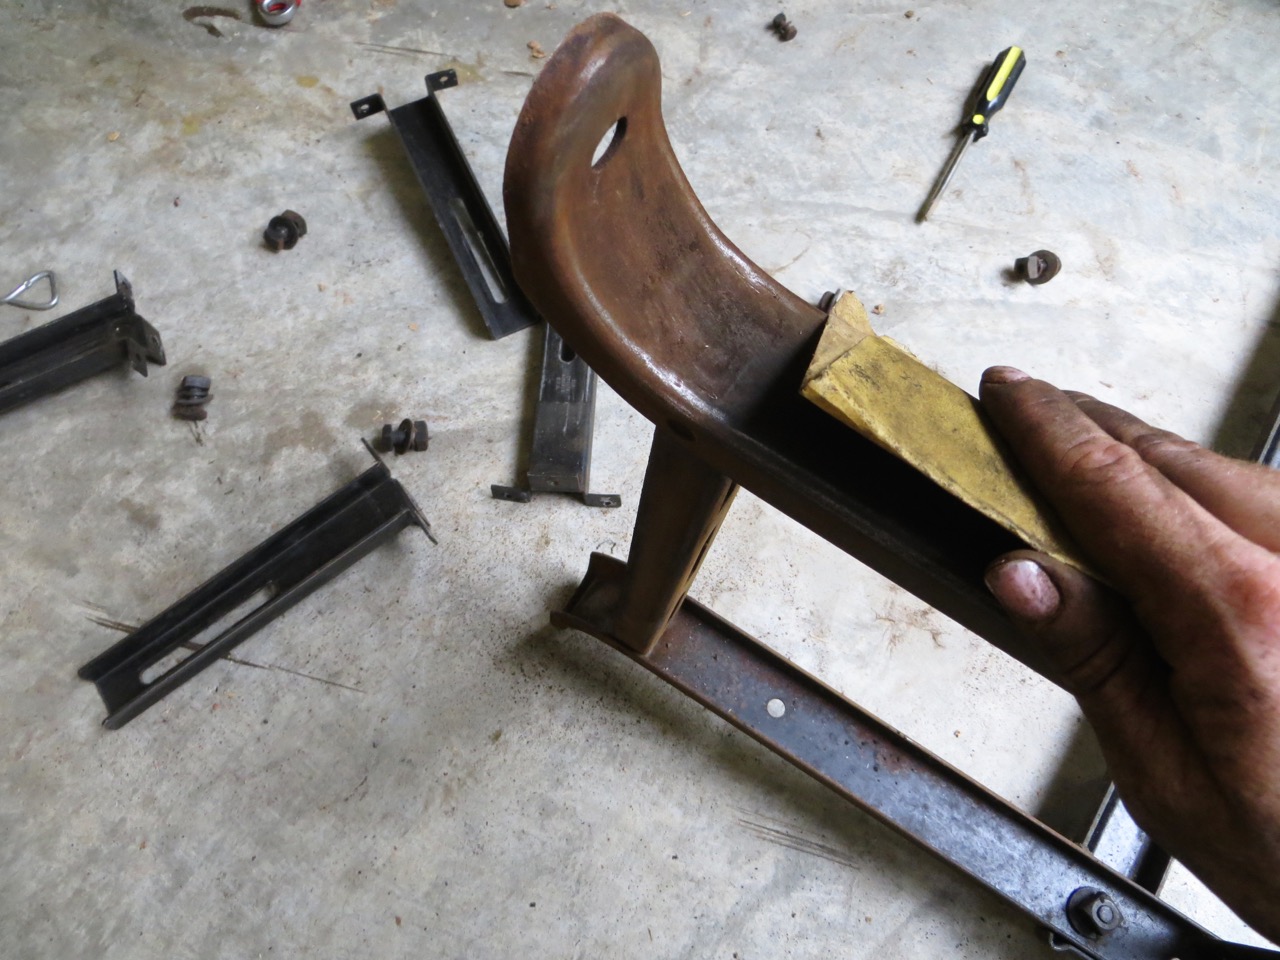
Are you ready to get your hands dirty!? These next steps were my least favorite and time-intensive but I knew doing the job right would mean having a nice finish in the end. You'll want to sand all the rust off your metal pieces to get them smooth. The only pieces I didn't sand were the bolts/nuts/washers... I'll get to that.
For the hard to sand places I used steel wool clamped in my pliers.
The bobbin winder and thread stand had a lot of gunk I couldn't get off by sanding because there was so much detailed pieces so I brought them inside with all the bolts/nuts/washers and gave them a scrub with vinegar. I usually use rubbing alcohol but it's really hard on my hands. I rinsed the pieces off with water and although I was reluctant to expose the pieces to water it was worth it - so much grime came off. I baked all my pieces in the oven at 200-degrees to dry them off quickly to prevent more rust.
Prep the rest of your stand pieces by blowing off as much dust as you can with your air compressor and then use TSP to wipe clean.
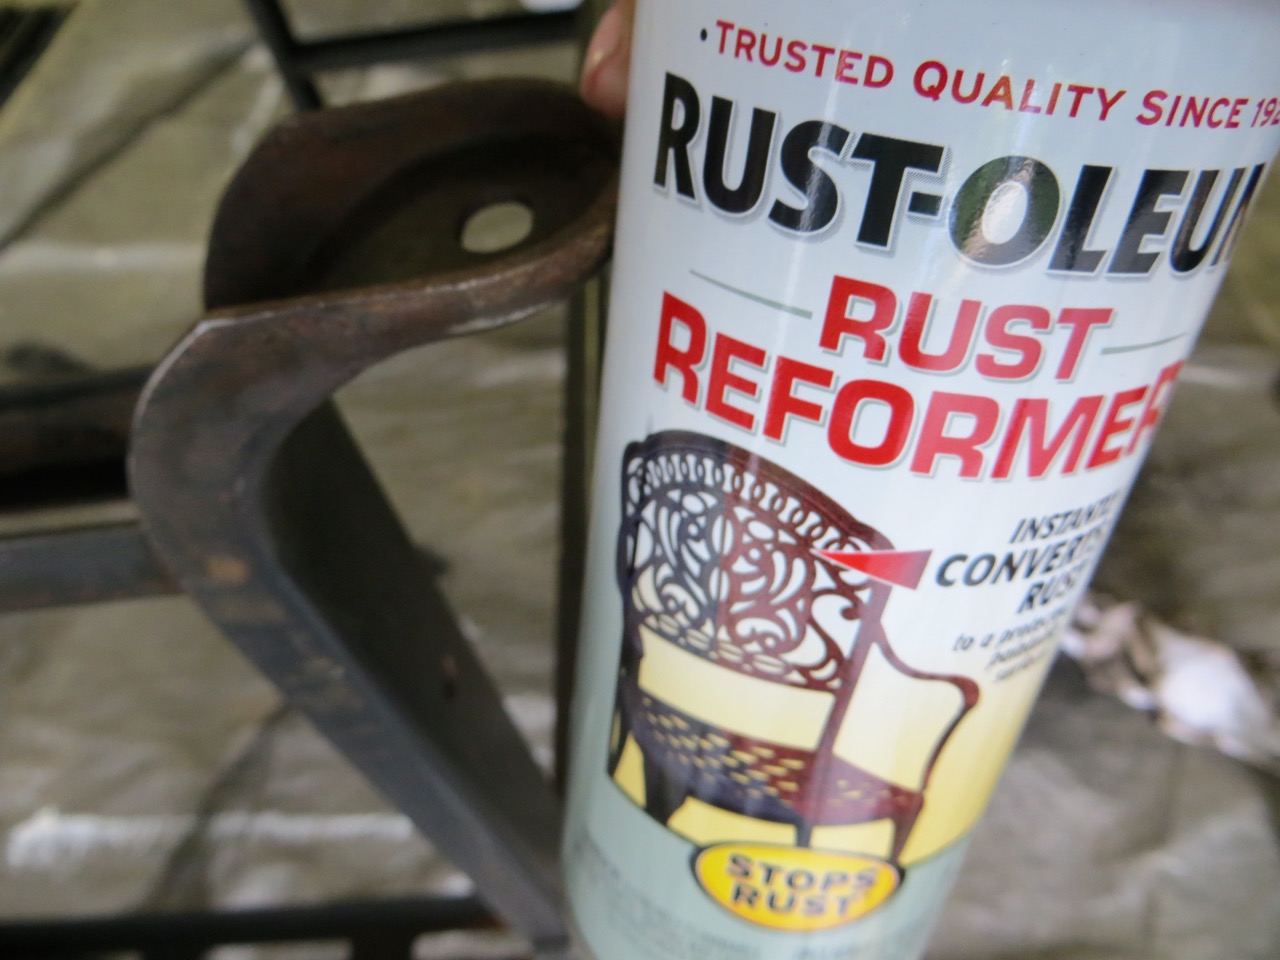
For the heavily-rusted areas I used a rust reformer before priming.
Lay out all your pieces for priming. It can be tricky to get all the sides coated well; do one side first, let dry, flip then paint last side.
Once your primer is dry spray two coats of the finish of your choosing. This gave me really great coverage and the pieces looked amazing!
I bought a sheet of adhesive cork and made a pattern the size of the surface I wanted to cover on my pedal.
The cork is really tacky and won't come off - now my foot will have good traction!
Give your table about 24 hours to dry before you assemble back together.
This is when I realized I wanted to keep the metal stand off my floors and that wooden 'sleds' would help me move the table by myself. This machine will be in our guest room/Dani's craft room so it will get moved every time we have visitors.
I was so proud that I bought square black bolts a few months ago (for no reason) because they matched the original bolts perfectly!
BOLTING THE SERVO-MOTOR TO THE TABLE
Right as I finished assembling the table a package arrived for me! The servo motor I ordered the day before!
Now what? It's very easy to install but you definitely want to make sure you have it lined up with the groove in your table where the belt runs through - you'll be drilling large holes for bolts and you don't want to mess that up!
I set my motor up in the position the old one was, then I used a paint stick to rest on the motor pulley and down through the groove in the table to fine-tune the position.
Once I was confident I had the motor where I wanted I marked where to drill for the bolts. Notice there's big black rubber pads the motor will rest on so give room for those.
I wanted to keep everything as original as possible so rather than using the silver bolts that came with the motor I used the original ones - they were shorter but still longer than necessary.
Drill holes slightly larger than bolts and place rubber pads over each one. You can see where the old holes are compared to the new holes.
Set motor over bolts with washers and tighten nuts.
Pre-drill and screw your on/off switch to the front of your table.
Use the plastic clips to hammer wire to the table. Avoid where the table legs will go.
Now for the machine! Ready!?
I took as many pieces off as I could to make cleaning the machine easier. I took a different approach to my regular method of cotton balls and rubbing alcohol (it really isn't good for the finish anyways) and used WD-40 to spray on a '0000' steel wool pad and scrubbed away on the finish.
I used a soft cotton rag to wipe clean. You may want to repeat WD-40 if you feel like you can get more grime off.
For polishing I buffed some turtle wax over the paint.
I soaked all my pieces in vinegar for an hour and scrubbed with a cleaning brush. It really helped loosen grime and helped remove surface rust. I reluctantly rinsed these pieces with water but still did knowing I was going to bake them in the oven to fully dry quickly.
Once my pieces were dry I rubbed some sewing machine oil on all their surfaces to protect from rusting. I put all the parts back on my machine so I could test everything out and see what pieces I needed to replace - if any. If your old belt doesn't fit you can use your hand to move the hand wheel to see how it stitches and if the thread catches anywhere.
My thread was catching really bad in the hook area and snapping/breaking the thread (regular sewing thread) but with the thicker #67 thread it would snag and let loose really quickly. I used 400 grit sand paper to try and clean up the hook and bobbin to polish smooth - it was still catching. The tension discs and main thread guide (by tension assembly) were really dull and rough - I sanded those too but wasn't pleased enough. I made a list of what I needed.
I could have replaced just the tension discs but it was only $5 more for the whole assembly. Before removing the original, take off the face plate with presser foot lowered to notice the gap between the tension rod and the tension release bar. There's a very small gap - about 1/32". You'll need to recreate this gap with the new assembly.
Remove the old assembly by loosening the screw on the side.
Here's a side-by-side comparison. Notice how much longer the rod is on the new assembly (right) - you need to trim it to fit your machine.
Slide your new assembly in (the opening on the side goes to the left and the spring-arm on top).
Because the rod was so long it kept the discs spread apart.
This is what the rod looked like inside - it was under a lot of pressure.
Use pliers and snip away a little, test, snip more, test, etc. Once I got closer to the length I needed I filed the rest to ensure I didn't take off too much.
The new rod is still longer than the original but that's because the assemblies aren't exactly the same.
I think I still cut too much off - see the gap is closer to 1/8" rather than 1/32" (this makes it so the tension doesn't completely release on my top thread when I put my presser foot up to take my material out - annoying for now - I'll just have to get a new one)! Oops!
UPDATE: I decided to make my own tension rod and within minutes I found a nail that was just the right diameter and cut off the head and made it slightly longer than the new one I just ruined and it works flawlessly!
I put on the new tension discs for the bobbin winder.
Here's comparing the new thread guides with the old (one of the old ones was missing).
I placed this thread guide hanging down because when it was horizontal my thread kept slipping out of the tension assembly.
Tap the other guides into the top (make sure you're not putting them in the 'oil' holes)!
Here's my new needle plate/feet dog and bobbins compared with the old. The new feed dogs have a much better grip on the fabric and they pull it through straight.
I attached feed dogs, then needle plate.
I noticed the old leather belt piece for the bobbin brake was really dry and easy to break...
...so I cut a chunk off the new motor belt and replaced it.
Here's the original hook (left) with the new one. They have slight differences but overall looked promising.
The new one fit into the grooves of the race...
...but wouldn't allow the race/cover to screw perfectly snug against the machine - this left the machine binding every 1/2 turn. I may attempt to sand it down in areas to get it to work but for now my thread will snag with the original.
ATTACHING THE LEATHER MOTOR BELT
Here are the supplies needed. Some people use a nail to make the hole in the belt but I find drilling the hole is much easier/faster/precise.
Don't use snippers because they cut the belt with a triangle tip and you want a clean-flat end. Clean up the original belt ends before you start because they're usually not very neat.
For my machine I got a 5/16"-thick belt and it sits in the grooves on my hand wheel and motor pulley perfectly.
Wrap the belt around motor pulley and hand wheel tightly.
Mark where they both meet.
Cut directly on your mark with your razor blade.
Make a hole in one end, centered, about 1/4" down (or half the length of your metal staple). Drill the second hole in the other end.
Put your belt around your motor pulley again and up next to the hand wheel.
Attach staple and crimp ends down tight with pliers.
Set machine back to get belt on.
My belt has too much give to it (you want a little). I lowered my motor by loosening the bottom bolt by the speed dial. If the motor is already in the lowest position you'll want to cut off more of your belt.
Attach cover over pulley.
BONUS SHOTS:
I made leather circles for the thread to sit on. It looks nice but also keeps the spools in place and adds a noise buffer.
Machine tilted back on wooden spindle.
See the hinges I got for the machine to tilt back on (the originals were missing).
I didn't have any industrial-thick thread so I had to buy some! I love pretty thread! From Lu Thread (great prices)!
Here's a test run on the machine with some leather and #69 thread. Runs so smooth and quiet!
My first project was making my baby his first pair of shoes!
He really liked them and my machine, too!
COST BREAKDOWN:
Machine - $100
Servo Motor - $120
Parts, belt, needles, etc - $110
Total = $330
I'm so excited about this machine! It's only straight-stitch with no reverse. It's beautiful and I love that it has history and character. Comparing this machine to my top-of-the-line, triple compound feed, self-oiling, "Rolls Royce" Durkopp Adler I am very satisfied (I sold it 6 months ago because it was too heavy & too much machine than what I needed). I love this Singer because it's smaller and lighter-weight than the Adler and doesn't have any unnecessary functions to worry about. It's simple and straight-forward sewing!

I fixed up the manual - download one here.
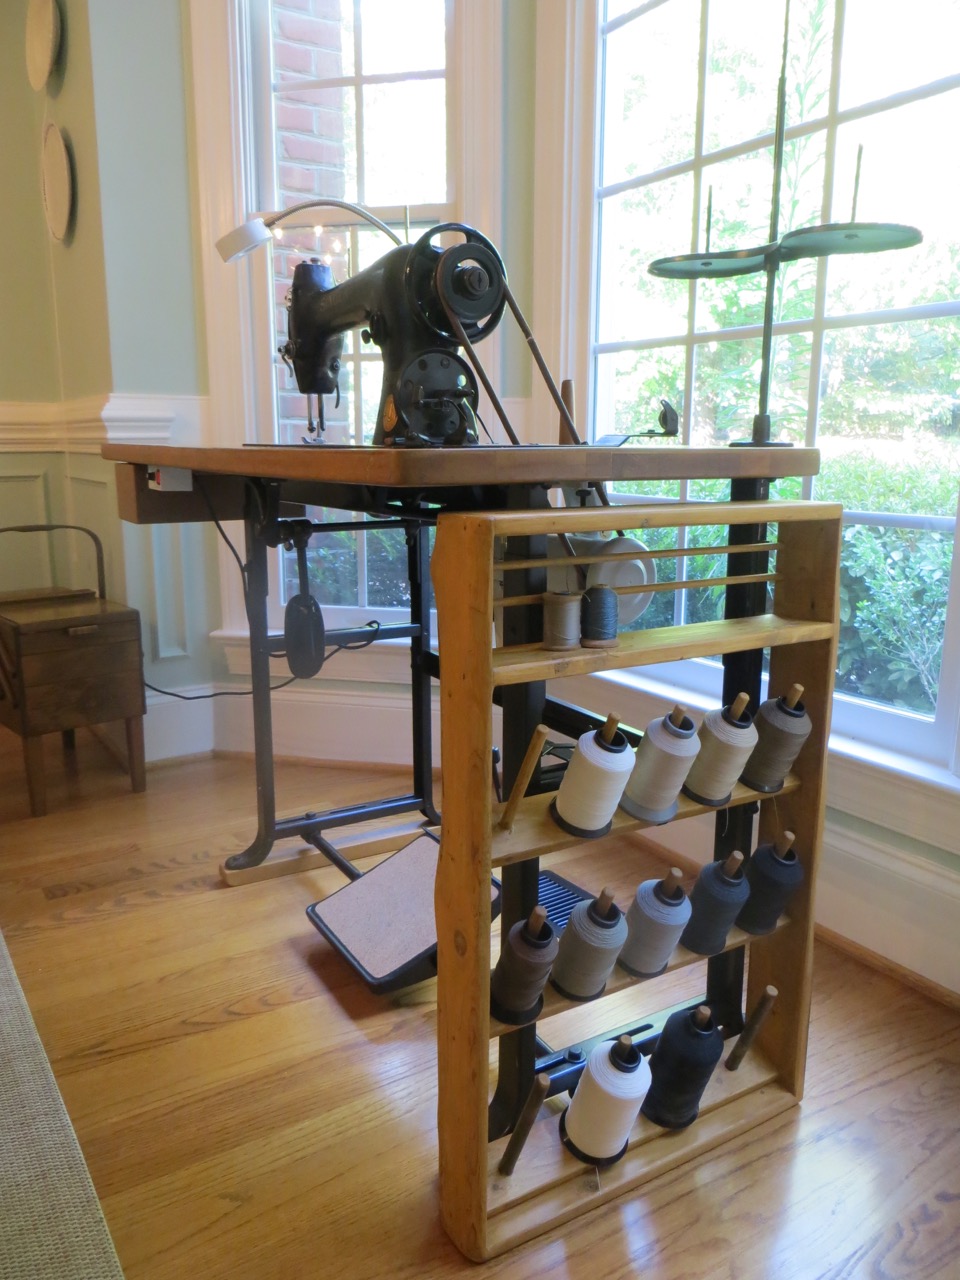
I just finished a thread organizer to go with the table! Click here for instructions.
I wanted to make use of the bracket on the back of my machine where the original light was clamped. I actually bought this light from the dollar store was surprised with how bright it is. I took of the base it came on, cut the wires so I could thread them through the hole on the table and attached the plug end back on.
It plugs right into the back of my motor...
...so the light comes on when I switch on the motor. I really like that I can adjust the light where I want.
CLEANING THE CLUTCH-MOTOR
Someone wired an extension cord to the motor switch...
...cut off the original light and left the wires hanging out of the motor...
...and used a lot of electrical tape.
I needed to fix that, don't you think?
I loosened the wires leading up to the motor...
...opened the terminal box and made sure to take a picture of how the wires matched up so I could put it back the right way.
I loosened the 4 large bolts holding the housing together and found a lot of dust and lint, wow!
This is part-way cleaned up inside - I used my detail vacuum extensions and cleaned it up real nice!
I bolted the housing back together to tackle those loose light wires. I cut them a little shorter and removed 3/4-inch of the covering on each wire...
...and screwed a wire nut on the ends. This makes me feel so much better!
Next I attached all the wires back on the terminals and closed up the box.
Next was the on/off switch and taking that extension cord off. Notice how the green ground wire is cut short and not grounded?
A clean slate to work with!
Here's the other side where the motor wires attach to the switch. We'll want to wire in the new wires so the black and white match up to these wires... but on the other side (thanks to my Dad and brother for helping me make sure I was doing this right).
I used a 6'-long extension cord, cut the end off and scored around the rubber sheathing to expose about 2-inches of the internal wires.
I stripped 3/4" off the stranded wires and twisted the ends tightly.
I made sure to attach the wires so they corresponded with the ones on the other side for the motor. Wrap wire around your screws from left to right so when you tighten screw they won't slip out.
The ground wire screwed right onto the metal housing.
I attached the metal clip-thing that was on the old extension cord - it holds the wires in the opening and clamps them down.
Rust - eek! I cleaned it up the best I could with a wire brush and WD-40.
Much better - it makes me so happy!
No more light wires hanging out either!
Labels: electrical, re-wire sewing machine, restoration, sewing machine, Singer