Someone hired me to build a mailbox post, flag pole, hose hanger and house sign for them - I'm so nice that I took pictures of the process so I can show you how to make your own!
This will be a long post! I hope you find it useful!
All items (except sign) are constructed from 4x4 treated posts that you dig 18-inches into the ground. The mailbox post and flag pole have a decorative trim wrapped around the bottom that will sit above ground once the post is buried. The house sign is made on a wooden plaque with flat metal rods for staking into the ground.
 Our house is too far from the road to put our house number on it and this is a perfect solution! Stake this sign into a flower bed close to the road where it stands out.
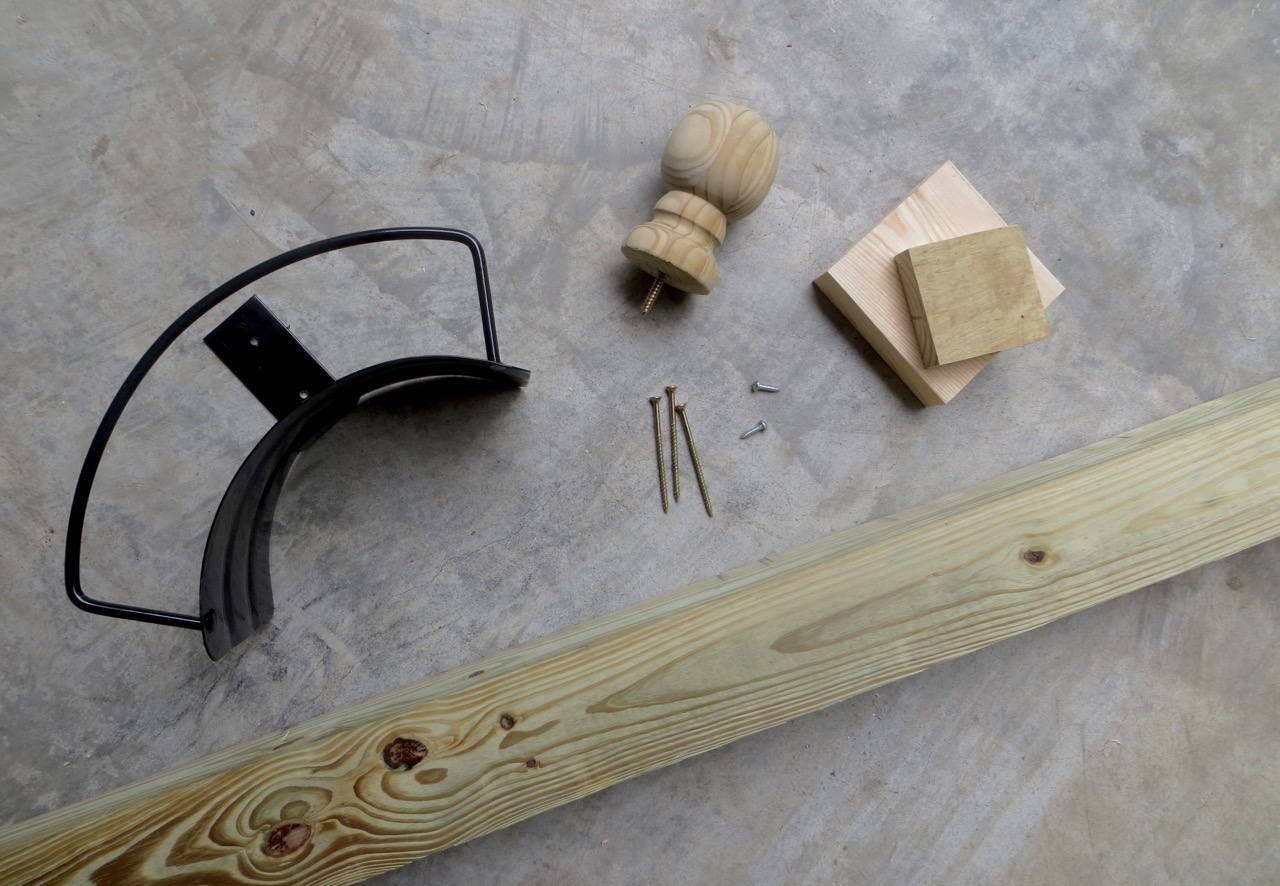
 The hose hanger has a metal hanging bracket you can buy at many different stores.
I designed the mailbox after our own. The only difference is it won't be in a pot (hehe), there isn't a door for the newspaper and I made the wooden slats lengthwise for the mailbox to screw onto rather than widthwise.
I don't have a picture of the flag pole buried in the ground but it's pretty easy to visualize. It's made from an 8-foot post and stands about 6-1/2 feet out of the ground.
I WILL PROVIDE A SUPPLY & TOOL LIST FOR EACH PROJECT BUT PLEASE SEE PICTURES AND READ INSTRUCTIONS BEFORE YOU GO SHOPPING IN CASE I MISSED SOMETHING!
Let's start with the easiest project first...
HOUSE SIGN
SUPPLY LIST:
10"-wide board (at least 16"-long for 3 numbers*)
4 (3/4"-long) Pan head Screws
*add approximately 3" to the board length for each additional house number you have
TOOLS:
Jigsaw
Router + Round-over Bit
Metal Grinder
Metal Drill Bit
Hammer
Square
Sander + Assorted Sanding Discs
Paint
I laid my numbers over my board and figured out what size plaque to make. I ended up making it 8.5-inches tall by 16-inches wide. Use the pattern from the download to trace your corners.
Cut your lines with a jigsaw and round over your top edges with a round-over bit. TIP: practice on a scrap piece of wood to get the height of your bit just how you want it.
Sand plaque with 100-150 grit paper. You will probably need to sand the detailed grooves from the router by hand.
Paint plague with 2 coats of paint, sanding lightly in between. Set aside to dry.
Cut 2 stakes from your flat metal bar about 15-inches long. I put tape over the areas I needed to mark so I could see where to cut easier. TIP: Protect your eyes from flying metal pieces and wear a heavy glove on the hand holding your metal.
Mark where to drill holes for your screws. TIP: hold the rod up to the back of your plaque to find the best placement.
Using a metal drill bit, drill over your markings with a scrap pieces of wood underneath.
Arrange numbers over plaque exactly how you want them. Nail into place. TIP: I lightly tapped all my nails in place so the numbers wouldn't move around while hammering fully.
Protect the front of your plaque by laying it down on something soft. Use a square to line up your stakes, pre-drill and screw in place.
HOSE HANGER
SUPPLY LIST:
1x6 board -or scrap- (cut to 4" square)
2x6 board -or scrap- (cut to 5-3/8" square)
4x4 post (cut to 54-inches) - pressure-treated recommended
Metal Hose Hanger*
3 3-1/2" screws
2 thick 1" pan head screws
Wood Filler
Outdoor Wood Finish
TOOLS:
Miter Saw
Drill + Wood Drill Bits
Impact Driver (recommended)
Metal Grinder + Metal Drill Bit (if hanger needs alterations)
Sander + Assorted Sanding Discs
Shovel or Post Digger
*I found my hanger at Tractor Supply which is really nice quality for around $5 BUT I needed to alter (see below)
The bracket on the hose hanger was WAY too long so I cut more than half off with my grinder... leaving it about 5-inches long total.
I had to drill 2 new holes for the screws with a metal drill bit. This took only a minute to do and was worth it for me to get the quality hanger (compared to a cheaper metal elsewhere). TIP: make sure your holes are slightly larger than your screws.
The top and finial pieces are identical for hose hanger, mailbox post and flag pole (refer below).
***INSTRUCTIONS FOR TOP***
Prep your post by having imperfections filled and sanded up to 150 grit before proceeding.
My favorite filler is Minwax High Performance filler where you need to mix a hardener in it - it dries strong and quickly.
Here's a knot before.
Application of filler. You only have 5 minutes to work with it before it dries.
Here's the knot after it's been sanded smooth.
Now for the top:
Cut your top blocks if they aren't already:
From 1x6 cut a 4-inch square.
From 2x6 cut a 5-3/8-inch square.
Sand your blocks smooth up to at least 150 grit. This picture shows the difference between sanding! I prefer to round my corners a bit.
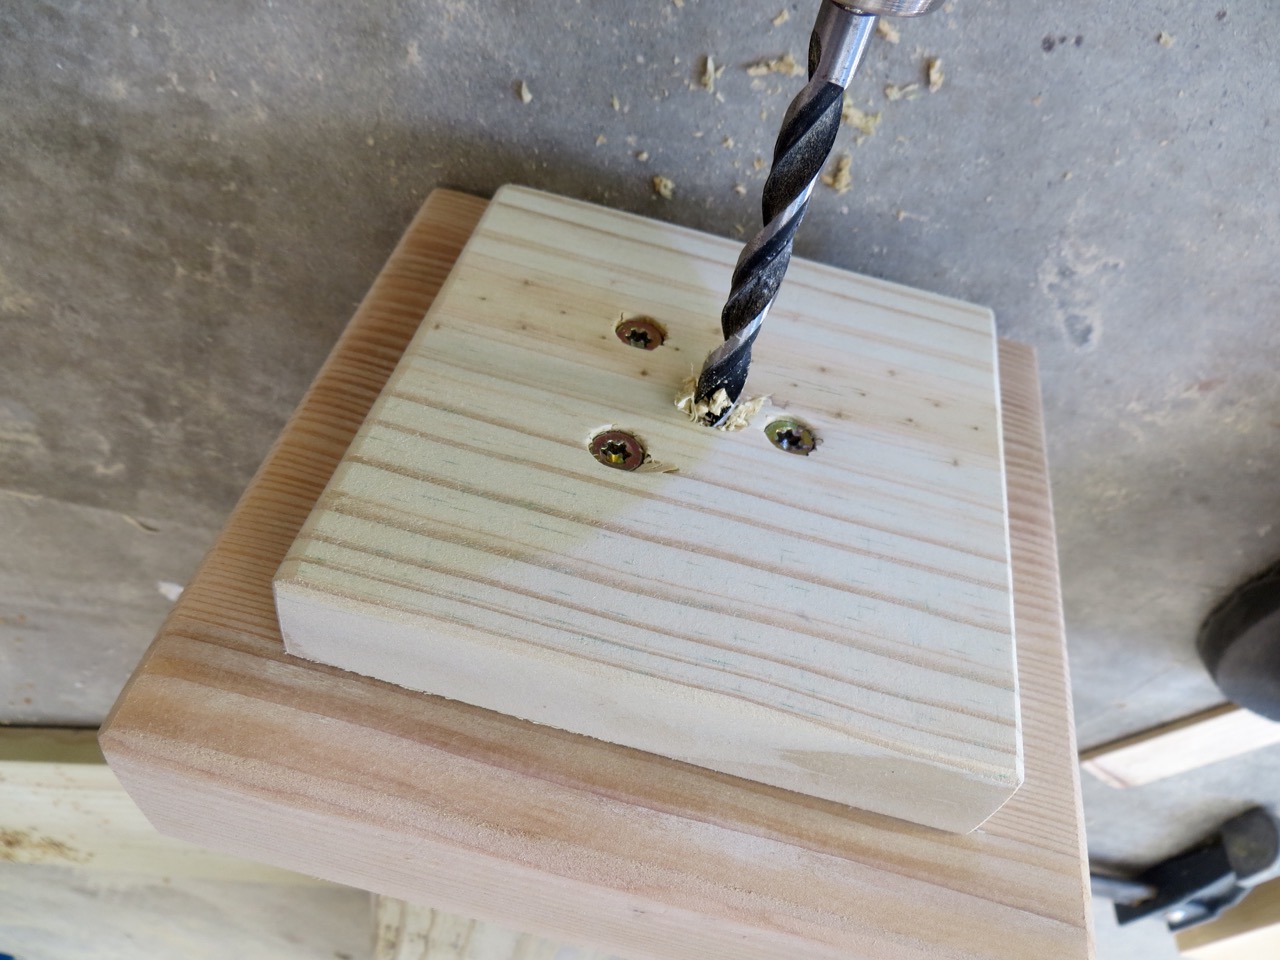
Center your small block over the larger and pre-drill holes and put your screws in so the tips barely poke through the bottom (this makes it easier for attaching to the post). TIP: if you're picky like me, make sure the end grain of your blocks are on the same ends and make sure your screws are clustered enough to be hidden under the base of the finial but leave room for the finial to screw into the center!
Align and center blocks over the end of your post and drive your screws in the rest of the way. An impact driver comes in really handy with things like this and an extra set of hands! TIP: put a spacer block under your post to lift off the ground.
Mark the center over the top block at 2".
Pre-drill a hole on center mark for finial.
Add finial and screw in as tight as possible. If you're concerned about the screw top coming loose over time you can add a little wood glue to the bottom.
***END***
-Continuing for Hose Hanger-
Center bracket on post and mark holes for screws. TIP: if you care about the end grain of your top blocks - have the smooth side grain on the front of post where your hanger will be.
Pre-drill holes.
Finish as desired following directions from manufacturer. I used exterior semi-gloss latex paint, doing 2 coats while sanding in between.
Attach hanger with pan head screws.
Dig an 18-inch deep hole for your post and fill in compactly! If you don't want to fill in with cement, consider placing large rocks around the post for stability.
SUPPLY LIST:
3/8"-diameter wood plugs (if staining)
3/4"-wide trim molding at least 24"-long
1x4x8 board - pressure-treated recommended
1x6x8 board - pressure-treated recommended
2x12 board or scrap at least 14"-long
4x4 post (cut to 80-inches) - pressure-treated recommended
3 3-1/2" Screws
Wood Glue
Wood Filler
Wood Plugs (if staining)
TOOLS:
Square
Nail Gun + 1-1/4" Finish Nails (if you don't have a nailer you can get by with a hammer)
Wood Clamps
Jigsaw or Bandsaw
Router + Round-over Bit
Miter Saw
Table Saw or Kreg Rip Cut Jig w/ circular saw
Drill + Wood Drill Bits
Impact Driver (recommended)
Sander + Assorted Sanding Discs
Shovel or Post Digger
I won't be doing a typical cut list because I've found it best to measure and cut as you work because there are variances as you go.
***BOTTOM TRIM PIECE***
(same for flag pole)
To make the trim piece for the bottom of our post we'll be wrapping it with our 1x4's and 1x6's. Cut 2 pieces from each board that measures 14-inches long.
You'll need to rip your 1x6's down to the width of your post plus the width of both of your 1x4's.
Measure up 18-inches and 32-inches from the bottom of your post and mark around each side with a square. The are between those marks are where your trim will be placed.
Decide what sides of your board you want facing out and mark 'O'. Rather than buttering the sides of your 1x4 board and the post, I just buttered between my markings on the post really well and put my 1x4 down and moved it back/forth to squeeze glue around. You'll be putting your 1x4's on opposite sides of the post - use your square to make sure the boards are perfectly aligned. TIP: Align all your boards along the 32" mark so attaching the trim is easy - the 18" mark will be against the ground and you won't see any slight difference on the bottom of your edges.
Tack boards in place with your finish nailer.
Now you'll attach the 1x6's that you ripped down to the other sides. Butter the post and the ends of the other boards with glue; align and nail just as the others.
Cut your trim molding for the top by cutting 45-degree angels on your miter saw. Take your time and get it right the first time. I cut a 45-degree corner, hold it up to find the next corner and cut it slightly larger than what I want, hold it up and decide how much more to take off. Keep that trim piece in place because you just customized it to that side. Work your way around until all 4 sides are complete. TIP: You may want to mark each piece with what side it goes to in case they fall off.
Butter all the edges of pieces to be glued and set in place.
Clamp pieces if necessary. Use your brad nailer to tack in place and use pressure while you nail to ensure the trim is tight against the post. Wipe off any excess glue with a wet rag to keep sanding to a minimum later on.
Here's what it should look like.
***END***
....continuing for mailbox post...
Cut out the templates from the download link. Now we get to have fun cutting out the decorative edges!
Cut 2 pieces from your 1x6 that are 22-inches long - these will be the sides of your newspaper box. Trace the newspaper box template on an end of each. TIP: be strategic with what corner you want to cut off - are there any imperfections?
From your 2x12 trace the template for the decorative brace. Make sure you will have enough scrap left over for a 5-3/8" square for one of your top pieces (set aside)!
Cut your pieces out. I clamped both of my 1x6's together on a table to get the cut the same and save time!
Trim a 45-degree angle off the back end of your 1x6's. See below for how you need to mirror the cut on your pieces.
Round the front edges of your brace with a round-over bit. TIP: practice on a scrap piece of wood to get the height of your bit just how you want it.
Cut a 4x4-inch block of wood from your 1x6 for the top to go with the other block you should have cut from your 2x12 scrap previously (set aside).
We need only 2 more boards (for now) to start assembling. You'll be cutting your 1x4 for the top and bottom pieces of your newspaper box. Remember all boards are slightly different and measurements aren't always cut perfectly so I can't give you an exact measurement for these but what I can say is that your boards should be roughly 18-1/2" for the top and 14" for the bottom piece. To understand how the box will be assembled see following pictures - that way you can align things to see what your true lengths should be.
Ok - NOW you're ready!
PS - don't worry about the dowel rod in this picture - we won't need it!
Measure 21-inches down from the top of your post and mark around on each side - this will be where the bottom of your newspaper box will be aligned. Study your post and find what sides you'd like best for the front and sides, or rather what side you dislike the most and want to hide in the back :)
Line up the bottom edges of your box sides to the lines on post and flush with the post back. Clamp in place. TIP: Use a spacer block to elevate the post the same height as the bottom trim.
If you have a pocket hole jig, drill a hole in the center of one of the ends of your bottom piece for the newspaper box. This is just an extra step I did and it makes me feel good - but totally optional!
Carefully place box bottom between sides and clamp in place. If you did a pocket hole, place it on the outside of your box (the brace will cover it).
Pre-drill and countersink 4 holes on each side piece where sides overlap post. Use 1-1/2" screws. TIP: countersink head of screw enough to accept wood plugs (if staining) or wood filler (if painting).
Pre-drill and countersink 3 holes along the edge of sides for attaching bottom piece. Use 1-1/2" screws. (If you did a pocket hole screw that in place now, too)
Align and center your decorative brace underneath your box. Pre-drill and screw in place from the inside of your box with 2 of your 2-1/2 screws.
On the bottom-flat edge of your brace pre-drill and countersink for your last 2-1/2" screw. TIP: countersink head of screw enough to accept wood plug (if staining) or wood filler (if painting).
Ensure brace is centered and screw in place.
Simplify your life and finish the inside of your newspaper box (don't forget the top piece, too) before assembly.
Clamp top board to box. Screw and countersink for 1-1/2" screws just as for the bottom.
Measure the bottom inner edge of your mailbox to determine the length and width of boards that will fit perfectly inside the metal lip. My mailbox is a larger variety and measured 8"-wide and 20"-long. For the lid on my mailbox to open I shortened the length to 18-1/2-inches and cut 2 pieces from my 1x4. To get 8-inches across I used a spacer board in between. To ensure my boards gave enough room for the mailbox in the back I used a small spacer board to keep everything 1/4-inch from my post (look at your mailbox to see if you need more space). Clamp in place.
I used 1-1/2" screws and knew they would poke through the top of my newspaper box if I wasn't careful, so I aimed for putting holes that would go into the sides of my box. Pre-drill and screw 2 1-1/2-inch screws into each board.
Complete top by finding
***INSTRUCTIONS FOR TOP***
-above-
 If you are staining your post you'll want to glue wood plugs into all your countersunk holes or fill in with filler for paint.
Fill in any other imperfections and sanded your surfaces up to 150 grit paper. The detailed work will require hand sanding.
Ready for paint!
PS - it was much easier to get around the surfaces without the mailbox slats on the top for the painting process.
Dig an 18-inch deep hole in the ground that will be wide enough to stabilize your post with cement.
PS- If you're wondering how our mailbox is standing in a small little pot I've wondered the same thing! I'm pretty sure the post is dug into the ground and the pot is 2-sections that hooks together around the post :)
FLAGPOLE
SUPPLY LIST:
3/8"-diameter wood plugs (if staining)
3/4"-wide trim molding at least 24"-long
1x4x8 board - pressure-treated recommended
1x6x8 board - pressure-treated recommended
2x6 board -or scrap- (cut to 5-3/8" square)
4x4x8 post (or taller depending on the height you want) - pressure-treated recommended
3 3-1/2" Screws
Wood Glue
Wood Filler
Outdoor Wood Finish
TOOLS:
Square
Nail Gun + 1-1/4" Finish Nails (if you don't have a nailer you can get by with a hammer)
Wood Clamps
Miter Saw
Table Saw or Kreg Rip Cut Jig w/ circular saw
Drill + Wood Drill Bits
Impact Driver (recommended)
Sander + Assorted Sanding Discs
Shovel or Post Digger
The flagpole is just like the mailbox post but without all the extras in the middle... and it's taller.
Finish bottom by finding
***BOTTOM TRIM PIECE***
-above-
 You should have everything like above except you need to cut your last top piece from your 1x6 that measures 4x4-inches.
Complete top by finding
***INSTRUCTIONS FOR TOP***
-above-
FINISHED!
Labels: DIY, tutorial, woodworking